Showing posts with label diy. Show all posts

Monday, 24 November 2014

Inspirational Monday: Advent Calendars

I can't believe advent is Sunday! It's all so crazy. The older I get the faster the year flies by. This year I wanted to make another advent calendar like I did last year but unfortunately time is of the essence. So I went ahead and purchased the ever so famous Ferm Living Advent Calendar! Super excited to fill it up with goodies for Edith!!!!


If I had the time to make my own advent calendar I would definitely take inspiration from the ones below. They are absolutely gorgeous! Happy Advent!


Nido

Kate's Creative Space
Snug.Studio
GIRLSTALKTOBOYS

An Angel at My Table
Babble
Apartment Therapy
In the Little Red House
Design Sponge
The Feminist Housewife


Thursday, 16 October 2014

DIY Star Mobile


Before Edith was born I was obsessed with getting her room together. I wanted it to be just right as I knew Edith was going to be very special and needed a special room to suit her. When we moved into our new flat recently, I wasn't sure how I was going to decorate her room. I knew I would keep some things from her previous room but I wanted her room to grow with her. I started to look around for inspiration but hadn't found it yet, until one day Edith said her wanted stars. It made so much sense as everything she talked about was moon and stars. I wasn't surprised as when I was little I had a star room too! So once I had the theme it was quite easy to put her room together. 

Last Christmas I had made her a teepee and I thought it would be great to have a star mobile hanging in her teepee. This way she could sit in her teepee read a book while looking at the stars. 

Here's how to make the star mobile, it's super easy!!!!!

What you need:


1. Star Stencil, I just found some stars using google images and printed them out, then cut them out.
2. Clear Tape
3. Clear Thread
4. Hemp String or something similar
5. Scissors
6. Nice stick, can be curved or straight, whichever you prefer
7. Glitter paper or whichever paper you prefer

1. First take your stencil and trace it on the back of the glitter paper
2. Then cut our your stars, cut different sizes to make your mobile look great!


3. Once you have cut out your stars, lay out how many stars you would like one strand. Once you have them lined up, lay down the clear thread on your stars. Then take the clear tape and tape the thread down on the stars. If you would like three strands of stars then do this three times. 


5. Once you have tied your star strands to the stick, take your hemp string, cut it to the length you would like the mobile to hang, then tie it around the stick in the middle. Viola you have a lovely Star Mobile!!!!


Monday, 10 February 2014

DIY Heart Felt Patch Leggings

I fell in love with the Mini Rodini Grey Heart Knee Patched Leggings from last season. I thought about purchasing them, but realised I could make the leggings myself. I came across this amazing heart felt patch tutorial from Honestly WTF and thought to myself, yep this is what I want to do. With Valentine's Day right around the corner, heart felt patched leggings would make the perfect gift for Edith.


I followed all the steps from Honestly WTF, you can check out her tutorial here, but I thought I would try to explain myself. 


What You Need:

- Pair of Leggings (I got my from Baby Gap, but any leggings will do)
36 gauge felting needle
- a felting sponge, but any thick kitchen sponge will do.
- some wool roving
- a heart cookie cutter (can be purchased at your local kitchen shop) 
an iron


With the leggings on, place a piece of tape at the knee, where you would like the heart to sit. Do this for both knees. Remove the leggings and insert the foam block into one of the legs. I inserted the foam block from the top of the trousers, this made it easier to place in the leg.

Next align your cookie cutter with the piece of tape. Adjust the positioning of the cookie
cutter if needed. Grab some of your wool roving and place it in the cookie cutter. Make sure to fill the bottom of the cookie cutter evenly with the wool roving. But don't get too much wool roving or you will have a very thick heart patch. I learned this the hard way:)

Take your felting needing holding it in an upright position and start to jab the wool in an up and down stabbing motion. Make sure to keep your needle in an upright position and not in a slanted position, this will break your needle. Keep stabbing the wool until the surface is flat and even.


Now remove the heart cookie cutter and use the tip of the felting needle to tidy up your edges or bits inside the heart. Patch up any bare or uneven spots by adding more wool roving where needed.


Now carefully peel the leggings away from the foam block and remove the foam block.You'll notice the fibers have transferred to the back of the leggings.


To smooth and set the patch, spray some water on the patch and iron the patch on a wool setting.


Note: While ironing the heart patch, I felt my heart wasn't complete. If you feel this is the case, re-insert the foam block and start stabbing the wool roving again. I went over the patch a couple of times until I felt the heart was flat and even. And then repeated the ironing.


Once you have the heart the way you want it on the leg, start on the other leg!!!!!

It's super simple and loads of fun!!!! Yes, I admit my hearts are perfect, but I think I did pretty good considering it was my first time ever felting! I'll post a picture of Edith wearing the leggings on Valentine's Day!


Monday, 3 February 2014

Inspirational Monday: Bunting!


I found this photo via pinterest and fell in love with it! I looked everywhere for this bunting, but couldn't find it, so I decided to make my own! I admit mine looks a bit more homemade then theirs, but it makes it more unique this way. Read on to find out how I created this cute bunting!

Materials needed:


A Sponge
Muslin
Acrylic Paint or fabric paint, either will work
Thread
Needle
Scissors
Triangle Pattern Piece
Square Pattern Piece
Paint Brush
Pencils

1. First decide how big you want your square muslin square to be. Trace the square on a thicker piece of paper. Cut out the square, take a pencil and trace the square on the muslin. Decide how long you would like your bunting and cut out that many squares.


2. Second, decide how big you would like your triangle to be on your square muslin piece. Note that you will be fraying the sides of your muslin square, so make sure and leave a little space around your triangle. I found a triangle on the internet and printed it out on a piece of paper. Cut out the triangle and trace the triangle on the sponge you will be using. 

3. Then cut out the sponge triangle.

4. Take some acrylic paint and put some on a paper plate or paint plate, if you have one. Dip the triangle in the paint. Make sure the paint is spread even on the sponge. I took a paint brush and would spread it around if I thought it wasn't on evenly. 


5. Make sure and practice a couple of times before finalising your triangle. I found that the sponge I used left little unpainted holes, so I had to take a paint brush and fill it in. Experiment. It's fun, you'll find out what works best for you.


6. Once I found a triangle I liked, I repeated this on all the muslin square pieces. Then I let them dry overnight.

7. Once the muslin pieces are dry. Take a needle and thread and sew the pieces together. I doubled my thread up twice to make the string a bit thicker. You can take string and sew it on the squares if you like. 


8. When sewing the muslin square together make sure and leave some space between each square so it looks like bunting. 

9. Once your squares are sewn together, hang it!!!!


Friday, 17 January 2014

Kids Room Ideas on a Budget

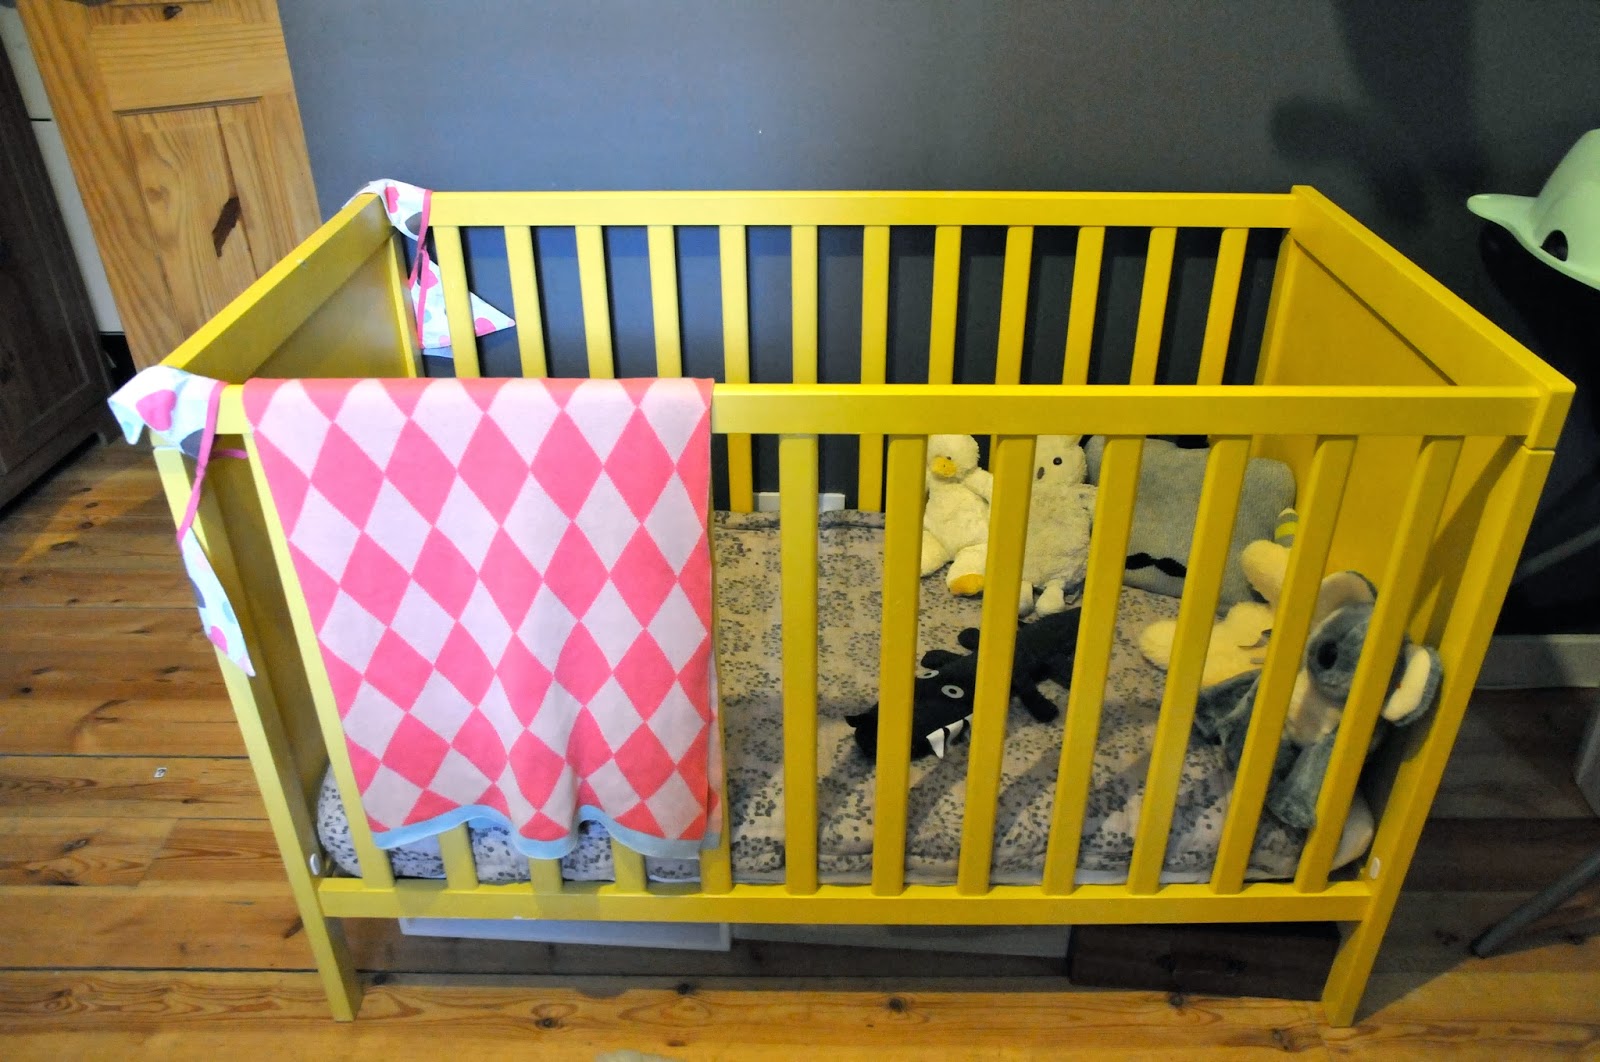
When it came to planning Edith's room, I went a bit crazy! I had a mood board and loads and loads of inspiration. My husband and I had an idea of what kind of cot we wanted and let me tell you, it wasn't cheap! We weren't sure we should spend loads of money on a bed as we figured a move out of the country wouldn't be far off and we didn't want to cart a bed around. So after thinking about it we decided to go for an Ikea bed and put our own personal touch to it. We figured the mattress was the most important element of the bed anyways, so we decided to spend more money on the mattress. We bought the Ikea Sundvik Cot in white for £90. I knew I didn't want a white cot, so I decided I would paint it. I was between grey and yellow, but as her walls were dark grey, I thought a contrasting colour would be perfect. So I set out to find the perfect yellow paint and voila this is what I got! If you can't find what your looking for just paint it!


Edith's room is an odd space and their wasn't much storage in the room. Yes there is a big wardrobe but it's filled with my clothes. We had some space let over and it wasn't very big, so I set out to find a tall and narrow cabinet. Luckily I found one through Ikea, Pax Wardrobe. I didn't like the look of it, so I decided to paint it. At our last flat I painted one wall with blackboard magnetic paint. I loved it! But as my husband had to sand down the wall in order for us to paint it back to white before we moved out, I thought it best to not do that again on a wall in our current flat. So I used this opportunity to paint the wardrobe with the magnetic blackboard paint. I used Rost-Oleum Magnetic Chalkboard Paint from Homebase. It's best to paint a couple of coats. The more layers the more magnetic it is. It's the perfect idea for kids as they can use it to draw on and for magnets. Because we live so far away from our families I decided to add velcro to the bottom of the wardrobe so I could stick pictures of our family for Edith to look at. She loves this as she can pull them off herself and stick them on. Hours of entertainment, well maybe not hours:) 


Lastily, I wanted a cute little table for Edith's room. She's to the age now where she wants her own table. So I started searching the internet for the perfect table. I wanted a vintage table, but we were on a budget and I was starting to find them a bit pricey. So I decided I would find a cheap table and paint the top of the table with chalkboard paint so Edith could draw on it. I settled on Ikea's Latt table for £17. Yep super cheap. Now it's not the greatest quality, but it will do for now. Again I used Rust-Oleum Chalkboard Paint, but not magnetic this time. 


Saturday, 7 December 2013

DIY Rollable Chalkboard


First off, apologies for not having a post for Chit Chat Friday today. I've been a bit behind on the blog as I was super busy with the Babyccino Kids ShopUp, which was wonderful!!!! But when you get behind it seems to take ages to get caught up. I was hoping to have a post ready for this morning, but I had my annual MRI since my brain haemorrhage.

Here at the Ekardt Casa, we have been in a DIY frenzy! I have always been crafty, I get it from my mom, but I haven't been so crafty with my husband. We decided it was time to start working on projects together. So our first project was to make our own Rollable Chalkboard. I have been eying Wallab's Roll Up chalkboard for ages, I was going to purchase it, but I didn't think it would come in time for Christmas, so we made our own.


I thought I would share with you how we made it.

Tools you need:
Self-Adhesive Blackboard. Ours is from Fancy Fix
Natural Canvas, I ordered ours from ebay
4 Pieces of wood, cut to the length you desire and thickness
6 Screws with bolts
2 Ring Hooks for hanging your chalkboard
String or Rope for hanging
Scissors, Ruler, Pins (for pinning side hem)

And if you want to use it like an advent calendar like I did, then you will need:
24 Small Envelopes
1 Number Stencil
1 Gold Marker

1. First off, cut your canvas to the desired size you would like your chalkboard to be. I  added a few centimetres to each side of my canvas so I could hem the sides lengthwise and and to leave a little spare on the ends. (this is important as your wood will go over the ends of your canvas and chalkboard.


2. Cut your self-advesive chalkboard to your desired size and then slowly stick it to the canvas. It actually sticks really well, I didn't need to add any reinforcement like glue. Smooth the chalkboard out so it looks really nice.

3. Drill three holes into each piece of wood at even intervals. Use a thinner drill-bit for drilling through the front and back piece (repeat three times), matching the diameter of your screws. On the back piece, widen the hole with a thicker drill-bit, matching the size of your bolts. Only widen the hole until roughly half-way through the thickness of the back piece. This allows you to 'bury' the bolt while still holding the back piece in place.


4. Now place the front piece of wood on your chalkboard, make a mark where the holes for the screws should be placed. Take an exacto knife and cut through the chalk board and fabric in the shape of a small cross. This allows the screw to glide through the fabric without any problems. Now line the back piece with the front and screw together. Do this again for the other end of the chalkboard.

5. Once you have your chalkboard all together. Screw in the ring hooks at the top of the chalkboard. Take string or rope and hang your chalkboard!


If you would like to use the chalkboard as an advent calendar like I have done.

Purchase some small envelopes, a number stencil and some gold markers. Stencil the envelopes and voila you can then stick your envelopes to the chalkboard. I just used sticky tack.


Making your own chalkboard is easy and looks really great hanging on your wall!!!


Related Posts Plugin for WordPress, Blogger...